アドオンは別ページに分割しました。
テクスチャペイント
3D ビューポート上でオブジェクトに展開されたテクスチャに直接ペイントできるモード
公式サイト:
Texture Paint | Blender Manual [Official]
使い方
操作
[ / ]: ブラシを小さく/大きくする (Scale Brush Size)
S: 色を採取する (Sample Color)
X: 前景色 (Primary Color) と背景色 (Scondary Color) を切り替える
F: ブラシの半径を変更する (Radius)
Shift + F: ブラシの強さを変更する (Strength)
Ctrl + F: テクスチャを回転させる (Texture Angle)
Ctrl + Alt + F: テクスチャマスクを回転させる (Texture Mask Angle)
M: マスクの有効/無効を切り替える (Paint Mask)
Alt + 右ドラッグ: マスクを移動する
Ctrl + Alt + 右ドラッグ: マスクを回転する
Shift + Alt + 右ドラッグ: マスクを拡大縮小する
参考:
テクスチャペイントを完全に理解する | 3DCG school
テクスチャペイントの方法/自由に描こう! | Vtuber の解剖学
UV 展開とテクスチャペイントとテクスチャをはるメモ | Blender 操作忘備録
Texture Painting – Simply Explained | All3DP
導入
参考:
テクスチャペイントの基本的な使い方 | TomoG のごちゃまぜ倉庫
テクスチャをペイントする方法を初心者向けに徹底解説 | Vook
Blender で作ったテクスチャを Unity に持っていく | ネコロモーフ
テクスチャスロット (Texture Slots)
描画対象のテクスチャを選択する。
モード (Mode)
- マテリアル (Material): マテリアルでアクティブな「画像」 (Image) ノードに設定されたテクスチャ画像に描画する。
- 単一画像 (Single Image): 描画対象のテクスチャ画像を直接指定する。
マテリアルモード (Material Mode)
プラスアイコン をクリックし、テクスチャの種類を選択してスロットを追加する。
- ベースカラー (Base Color)
- スペキュラー (Specular)
- 粗さ (Roughness)
- メタリック (Metallic)
- ノーマル (Normal)
- バンプ (Bump)
- ディスプレイスメント (Displacement)
ドキュメント:
Texture Slots | Blender Manual [Official]
ツール (Tools)
- ドロー (Draw)
- ぼかし (Soften)
- にじみ (Smear)
- クローン (Clone)
- フィル (Fill)
- マスク (Mask)
ドキュメント:
Texture Paint Tools | Blender Manual [Official]
Tool Settings | Blender Manual [Official]
ブラシ (Brushes)
- ブレンド (Blend)
- 半径 (Radius): ブラシの大きさ (単位:px)
- 強さ (Strength): 描画時の濃さ (範囲:
0~1) - カラーピッカー
- カラー (Color)
- 前景色 (Primary Color)
- 背景色 (Secondary Color)
- カラーを交換 (Swap Colors): 前景色 (Primary Color) と背景色 (Scondary Color) を切り替える
- 共通のカラーを使用 (Use Unified Color): ブラシ間で共通のカラーを使用する
- グラデーション (Gradient)
- 追加 (Add)
- 削除 (Delete)
- メニュー
- カラーランプを反転 (Flip Color Ramp)
- ストップを左から配置 (Distribute Stops from Left)
- ストップを均等に配置 (Distribute Stops Evenly)
- スポイト (Eyedropper)
- カラーランプをリセット (Reset Color Ramp)
- カラーモード (Color Mode)
- RGB (デフォルト)
- HSV
- HSL
- 補間 (Interpolation)
- イーズ (Ease)
- カーディナル (Cardinal)
- リニア (Linear/デフォルト)
- Bスプライン (B-Spline)
- 一定 (Constant)
- カラーバンド (Color Band): カラーストップをスライドして移動させる
- アクティブカラーストップ (Active Color Stop): アクティブなカラーストップの番号
- 位置 (Position): アクティブなカラーストップの位置
- カラー (Color): アクティブなカラーストップの色
- 背景カラー (Background Color)
- グラデーションマッピング (Gradient Mapping)
- 圧力 (Pressure)
- リピート (Repeat)
- 範囲制限 (Clamp)
- カラー (Color)
- カラーパレット (Color Palette)
- 詳細 (Advanced)
- アンチエイリアス (Anti-Aliasing): ブラシ描画の境界を滑らかにする (※ 2D ペイント時のみ有効)
- 蓄積 (Accumulate): 単一のストローク内での重ね塗りを有効にする
- テクスチャ (Texture)
- 閲覧 (Browse)
- 名前 (Name)
- テクスチャタブに表示 (Show Texture in Texture Tab)
- マッピング (Mapping)
- 角度 (Angle)
- レーキ (Rake)
- ランダム (Random)
- 角度 (Angle)
- オフセット (Offset)
- X / Y / Z
- サイズ (Size)
- X / Y / Z
- テクスチャマスク (Texture Mask)
- ストローク (Stroke)
- 減衰 (Falloff)
- カーブプリセット (Curve Preset)
- カスタム (Custom)
- ズームイン ()
- ズームアウト ()
- メニュー
- 表示リセット (Reset View)
- ベクトルハンドル (Vector Handle)
- 自動ハンドル (Auto Handle)
- 自動固定ハンドル (Auto Clamped Handle)
- カーブをリセット (Reset Curve)
- クリッピングオプション
- クリッピングを使用 (Use Clipping): 領域を制限する
- 最小 X / Y (Min X / Y): 領域の下限を指定する (デフォルト:
0.0) - 最大 X / Y (Max X / Y): 領域の上限を指定する (デフォルト:
1.0)
- ポイント削除 (Delete Points): アクティブなポイントを削除する
- カーブプロファイル (Curve Profile)
- カーブ上をクリックしてポイントを追加する
- ポイントをドラッグして移動する
- X / Y:アクティブなポイントの位置
- プリセット (Preset):カーブをプリセット形状に設定する
- スムーズ (Smooth)
- 球 (Sphere)
- ルート (Root)
- シャープ (Sharp)
- リニア (Linear)
- 一定 (Constant)
- スムーズ (Smooth)
- スムーザー (Smoother)
- 球 (Sphere)
- ルート (Root)
- シャープ (Sharp)
- リニア (Linear)
- よりシャープ (Sharper)
- 逆二乗式 (Inverse Square)
- 一定 (Constant)
- カスタム (Custom)
- カーブプリセット (Curve Preset)
- ブラシ先端 (Brush Tip): ブラシを表示する
- カーソルカラー (Cusor Color/デフォルト:
#FFA8A8/0.9) - 減衰の不透明度 (Falloff Opacity/デフォルト:
30%)- オーバーレイ無効 (Override Overlay)
- カーソルオーバーレイを使用 (Use Cursor Overlay)
- テクスチャの不透明度 (デフォルト:
30%)- オーバーレイ無効 (Override Overlay)
- テクスチャのオーバーレイを使用 (Use Texture Overlay)
- マスクテクスチャの不透明度 (デフォルト:
33%)- オーバーレイ無効 (Override Overlay)
- カーソルカラー (Cusor Color/デフォルト:
ドキュメント:
Brushes | Blender Manual [Official]
Brush Settings | Blender Manual [Official]
参考:
ペイントブラシのオプションを完全に理解する | 3DCG school
テクスチャ (Texture)
- マッピング (Mapping)
- ビュー平面 (View Plane)
- タイル状 (Tiled)
- 3D
- ランダム (Random)
- マスク (Stencil)
- 角度 (Angle)
- レーキ (Rake)
- ランダム (Random)
- 角度 (Angle)
- オフセット (Offset)
- X / Y / Z
- サイズ (Size)
- X / Y / Z
ドキュメント:
Texture | Blender Manual [Official]
参考:
テクスチャペイントモードで画像を 3D モデルに転写/投影する | XR-Hub
TexDraw doesn’t actually draw anything onto the model – Blender Stack Exchange
TexDraw not working – Blender Stack Exchange
テクスチャ投影 (Texture Projection)
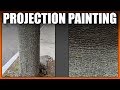 Texture Extraction by Projection Painting
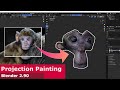 Projection Painting in Blender 2.90
参考:
テクスチャペイントモードで画像を 3D モデルに転写/投影する | XR-Hub
テクスチャマスク (Texture Mask)
ドキュメント:
Texture & Texture Mask | Blender Manual [Official]
にじみ (Bleed)
シームを跨いでテクスチャをペイントした時に境界における接続を滑らかにする。
手順
- 3D ビューでオブジェクトを選択する。
- オブジェクトのモードを「テクスチャペイント」 (Texture Paint) モードに切り替える。
- 3D ビューポート右側にあるサイドバーを開いて「ツール」 (Tool) タブに切り替える。
- 「オプション > にじみ」 (Options > Bleed) の大きさを調整する。(デフォルト:
4px)
ドキュメント:
Bleed | Blender Manual [Official]
参考:
Bleed px in Blender 2.8 – CG Cookie Community
Texture painting margin size – Blender Stack Exchange
UV/Texture pixels crossed by Seam edge are not painted as expected – Stack Overflow
Getting rid of texture bleed from opposite edge – Blender Stack Exchange
Texture showing errors (edges of texture)? – Blender Stack Exchange
T50831 Texture Paint ‘Bleed’ is angled along UV edges | Blender Developer [Official]
rB871248a77d8a: Fix texture paint UV dilation algorithm | Blender Developer [Official]
rB10d9a2494fc5: Texture Paint round corners of dilated UV seams | Blender Developer [Official]
遮蔽 (Occlude)
手順
- 3D ビューでオブジェクトを選択する。
- オブジェクトのモードを「テクスチャペイント」 (Texture Paint) モードに切り替える。
- 3D ビューポート右側にあるサイドバーを開いて「ツール」 (Tool) タブに切り替える。
- 「オプション > 遮蔽」 (Options > Occlude) を有効にする。
ドキュメント:
Occlude | Blender Manual [Official]
参考:
簡単!日焼け跡を作成する方法! | TomoG のごちゃまぜ倉庫
クローンブラシ (Clone)
3D ペイント
3D カーソルの位置を参照元 (開始位置) としてビューポートから見たテクスチャを写し取る。
Ctrl + クリック: 3D カーソルをセットする。
2D ペイント
- サイドバーの「ツール > ブラシ設定 > 詳細設定 > 画像」 (Tool > Brush Settings > Advanced > Image) で転写元の画像を選択する。
- 「アルファ」 (Alpha) で転写元画像を表示する際の不透明度を指定する。
- 右ドラッグ で転写元画像を移動させる。
- 画像の上を ドラッグ してテクスチャを転写する。
ドキュメント:
Clone | Blender Manual [Official]
参考:
How to set the 3D cursor in texture paint mode? – Blender Artists Community
マスク (Masking)
- ステンシルマスク (Stencil Mask)
- キャビティマスク (Cavity Mask)
マスクツール
ステンシルマスクを 3D ビューポート上で編集する。
手順
- プロパティエディターの「アクティブツール > マスキング > ステンシルマスク」 (Active Tool > Masking > Stencil Mask) を有効にし、「ステンシル画像」 (Stencil Image) にマスク画像を指定する。
- 「UV レイヤー」 (UV Layer) で使用する UV マップを指定し、「表示カラー」 (Display Color) でマスクを表示する色を指定する。
- 「ビューポートオーバーレイ」 (Viewport Overlay) の設定で、「テクスチャペイント > ステンシルマスク不透明度」 (Texture Paint > Stencil Mask Opacity) の値を
0~1で指定する。 - 「マスク」 (Mask) ツールに切り替えて、3D ビューポートでマスクを描画する。
- 「アクティブツール > ブラシ設定 > 詳細設定 > マスクの値」でマスクに塗る値を
0~1で指定する。
ドキュメント:
Mask | Blender Manual [Official]
Mask – Tools | Blender Manual [Official]
参考:
フォールオフ (Falloff)
ドキュメント:
Falloff | Blender Manual [Official]
参考:
How to get a square brush in texture paint? – Blender Stack Exchange
対称 (Symmetry)
- ミラー (Mirror): 3D ビューポートでヘッダーに表示されるミラーアイコン (蝶に縦の破線が入ったアイコン) の右に表示される「X / Y / Z」をクリックして各軸について対称な描画の有効/無効を切り替える。
「ミラー」 (Mirror) を有効にすると、オブジェクトのローカル座標系に対して対称に描画できる。
ドキュメント:
Symmetry | Blender Manual [Official]
参考:
Texture Painting weird brush behaivior – Blender Stack Exchange
画像エディター (Image Editor)
ドキュメント:
Image Editor | Blender Manual [Official]
Sidebar | Blender Manual [Official]
Image Settings | Blender Manual [Official]
参考:
保存 (Save)
画像エディターで編集中の画像は、サイドバーで「画像」 (Image) タブに切り替えて、「画像 > 保存」 (Image > Save) ボタンを押すことで保存できる。
メニューで「ファイル > 保存の確認」が有効になっている場合、Blender の終了時に未保存の画像があると、未保存の画像を保存するかどうか尋ねるダイアログが表示される。
画像を全て保存 (Save All Images)
「テクスチャスロット」 (Texture Slots) パネルにある「画像を全て保存」 (Save All Images) ボタンを押して、編集した画像を全て保存する。
参考:
How to save it? – Blender Artists Community
Auto-Pack packs edited images as internal PNG – Right-Click Select
外部 (External)
手順
- メニューから「編集 > プリファレンス」 (Edit > Preferences) を開き、「ファイルパス」 (File Paths) タブに切り替えて、「アプリケーション > 画像エディター」 (Applications > Image Editor) に画像を編集するアプリのパスを設定する。
- サイドバーの「ツール」 (Tool) タブで「オプション > 外部」 (Options > External) から使用する。
ドキュメント:
External | Blender Manual [Official]
Applications | Blender Manual [Official]
参考:
Blender の画像編集を Photoshop と紐づける話 | 3DCG school
Image Re-Projection | Sintel Blog Archive
Texture Painting creating bad seams on model. UV bleeding is incorrect. – Blender Artists Community
ブラシ画像
動画:
 Texture Painting with This Useful Addon (Danny B Creative)
参考:
Import brush set – Blender Stack Exchange
テクスチャが滑らかにならない
参考:
How to get rid of this seam on my texture? – Blender Stack Exchange
UV texture paint not working on sharp edges/tips? – Blender Stack Exchange
シームを滑らかにしたい
- 「にじみ」 (Bleed) を適切に設定する。
- 「にじみ」 (Smear) ブラシでなじませる。
- 「ぼかし」 (Soften) ブラシでなじませる。
- 「クローン」 (Clone) ブラシでテクスチャの境界を隠す。
参考:
肌などの画像テクスチャの境界を消す方法 | ケケケとショボーン
Avoid Seams in Textured Objects! – Blender Artists Community
How to remove/blur the texture seam? – Blender Stack Exchange
Feathering a shader at the edges of the seams – Blender Stack Exchange
How to Mix Face Textures Across UV Edges – Blender Stack Exchange
パックされた画像を外部に保存する
ドキュメント:
Unpack Data | Blender Manual [Official]
参考:
Is there a way to save the textures used inside a .blend file to a PC? – Blender Stack Exchange
ブラシを作成する
参考:
ポリペイントモードで、自作ブラシなどを追加する | マイクロストック、投稿型ストックフォト、または投稿型素材写真サイトの話
Creating a brush in texture paint – Blender Artists Community
UDIM
参考:
正常に描画できない
- UV マップが重なっていないか確認する。
- 「にじみ」 (Bleed) を適切な値に設定する。
参考:
Texture Paint bleeding through from back to front – Blender Stack Exchange
Can’t texture paint properly – Blender Stack Exchange
画像端で余計な色がにじむ
現象:
3D ビューポート上で、テクスチャ画像の上下左右端付近に描画すると反対側の画像端に描画がにじむ。
対処法:
サイドバーから「ツール」 (Tool) タブで「オプション > にじみ」 (Options > Bleed) の大きさを 0 に設定する。
参考:
Getting rid of texture bleed from opposite edge – Blender Stack Exchange
描画中にワイヤフレームを表示したい
参考:
Paint Mask doesn’t show wireframe – Blender Stack Exchange
ドキュメント
Texture Paint | Blender Manual [Official]
開発
Layered Textures Design | Blender Developers Blog [Official]
Layered Textures Design Feedback – Blender Developer Talk
まとめ/Tips
Blender 2.80 のテクスチャペイント Tips | dskjal
UV 展開のやり方/考え方/注意点/展開方法 | 忘却まとめ
Blender でのテクスチャの作り方 & おすすめのアドオン | Render Pool
アドオン
参考:
Blender でのテクスチャの作り方 & おすすめのアドオン | Render Pool
チュートリアル
Texture Extraction Projection Painting #1
Symmetrize Texture
入手:
Symmetrize Texture | Blender Market
参考:
Symmetrize Texture – 左右対称 UV にペイントや鏡面コピー出来るアドオン | MODELING HAPPY
Texture Library Manager
指定したフォルダ内のテクスチャを一括して追加し、管理できるアドオン。
ペイントモードあるいはスカルプトモードに切り替えて、3D ビューポートのサイドバーで「ツール」 (Tool) タブに切り替え、「Texture Library」パネルから操作する。
- 追加 (Add)
- 削除 (Remove)
- 更新 (Refresh)
- 消去 (Clean)
入手:
Texture Library Manager | Gumroad
フォーラム:
Texture Library Manager for Blender 2.8 | Blender Artists Community
Texture Library Manager | Blender Artists Community
参考:
Texture Library Manager – テクスチャを一括読み込み/表示切り替えができるアドオン | 忘却まとめ
Texture Library Manager – ブラシ用のテクスチャを一括読み込みできるアドオン | CGrad Project